

Below are specimens of plaster textures which are in most common use today.
The term “plaster” is used generally to describe material prepared with either Portland cement or gypsum. The term “stucco” used herein describes a factory-prepared, integrally colored finish which over the years has come to be used to describe all colored Portland cement finishes.
Each of the pictures shown below depicts a one-square-foot panel.
Plaster prepared in a plastic state may create a great variety of design configurations or texture patterns. Note: weather will affect color and/or texture.
Plaster is the most commonly used exterior cladding the Southwest. Since it lasts the life of the building, redecoration is necessary only when a change in color and/or texture is desired. Nevertheless, stucco is one of the most economical materials a designer can specify. Marblecrete, for example, produces a highly attractive surface at a fraction of what exposed aggregate concrete costs. The architect is limited only by his or her imagination in choice of texture treatments.
It is recommended that the contractor request a samples before construction to assure that all parties agree on the finish to be produced. Color selection should be made at the time specifications are written. Deeper colors call for additional pigment and are therefore priced higher and can also affect the texture.
These are only the most commonly used. Identifying names are those by which the texture is commonly referred to in the trade.
Suggested application procedures are included as general, abbreviated guidelines to the production of each texture. The textures shown can be used on either exterior or interiors. Interior plaster is formulated with gypsum rather than Portland cement. Generally speaking, heavier textures with deeper relief are used on the outside.
Mill-mixed colored stucco is produced under controlled conditions in modern plants to insure uniformity from batch to batch.
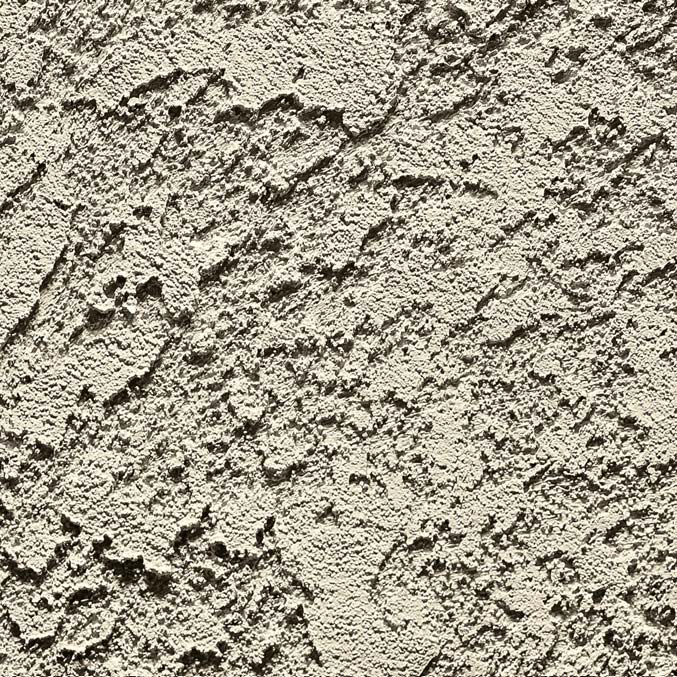
Fine Sand Float Stucco Finish
SUGGESTED APPLICATION PROCEDURES:
1. Apply a first coat and double back with a second application. Plaster mix is to be formulated with a blend of a 20/30 aggregate.
2. Using circular motion, rub surface with float to achieve uniform pattern, bringing sand particles to surface. An absolute minimum of water should be used in floating.
Medium Sand Float Stucco Finish
SUGGESTED APPLICATION PROCEDURES:
1. Apply a first coat and double back with a second application. Plaster mix is to be formulated with a blend of a 16/20 aggregate.
2. Using circular motion, rub surface with float to achieve uniform pattern, bringing sand particles to surface. An absolute minimum of water should be used in floating.
Heavy Sand Float Stucco Finish
SUGGESTED APPLICATION PROCEDURES:
1. Apply a first coat and double back with a second application. Plaster mix is to be formulated with coarse aggregate or relatively coarse blend.
2. Using circular motion, rub surface with float to achieve uniform pattern, bringing sand particles to surface. An absolute minimum of water should be used in floating.
SUGGESTED APPLICATION PROCEDURES:
1. Apply a first coat to produce complete color coverage.
2. Apply a second dash coat for texture depth and uniformity when first coat is dry, using a plaster mix of thinner consistency.
3. Use proportionately more atomizing air at the gun nozzle.
Light Dash Stucco Finish
SUGGESTED APPLICATION PROCEDURES:
1. Apply a first coat to produce complete color coverage.
2. Apply a second dash coat for texture depth and uniformity when first coat is dry.
3. Use a medium amount of atomizing air at the gun nozzle.
Medium Dash Stucco Finish
Heavy Dash Stucco Finish
SUGGESTED APPLICATION PROCEDURES:
1. Apply a first coat to produce complete color coverage.
2. Apply a second dash coat for texture depth and uniformity when first coat is dry, mortar to be of relatively stiff consistency.
3. Use relatively less atomizing air at the gun nozzle and lower water ratio of the plaster.
Tunnel Dash Stucco Finish
SUGGESTED APPLICATION PROCEDURES:
1. Apply a first coat to produce complete color coverage.
2. When surface moisture leaves, or on second day, apply a second heavy coat.
3. Use low atomizing air and reduce water ratio of the plaster.
Knockdown Dash Stucco Finish
SUGGESTED APPLICATION PROCEDURES:
1. Apply a first coat in thin consistency to produce complete color coverage.
2. Apply a coarse second dash coat for texture depth and uniformity, allowing some of the first coat to show through.
3. Trowel lightly after moisture surface leaves.
SUGGESTED APPLICATION PROCEDURES:
1. Apply a first coat to produce complete color coverage.
2. Apply a second dash coat for texture depth and uniformity when first coat is dry.
3. Use a medium amount of atomizing air at the gun nozzle.
Smooth Stucco Finish
SUGGESTED APPLICATION PROCEDURES:
1. Apply a first coat to completely cover base.
2. Apply a second coat and steel trowel to a smooth finish, leaving minor tool marks and “open” areas.
Note: An accelerator can be used in the first coat. Smooth finishes are subject to moderate cracking. Also,“burn” lines and color mottling can be expected. TSIB recommends further decorating of this finish with an approved coating.
Santa Barbara Stucco Finish
Cat Faces Stucco Finish
SUGGESTED APPLICATION PROCEDURES:
1. Apply a first coat to completely cover base.
2. Apply a second coat and steel trowel to a smooth finish leaving the first coat exposed in the design specified.
Note: An accelerator can be used in the first coat. Smooth finishes are subject to moderate cracking. Also,“burn” lines and color mottling can be expected. TSIB recommends further decorating of this finish with an approved coating.
Light Lace Stucco Finish
SUGGESTED APPLICATION PROCEDURES:
1. Apply a first coat to completely cover base.
2. When surface moisture leaves, trowel apply light second coat in random directions.
3. Knock down surfaces lightly with trowel.
SUGGESTED APPLICATION PROCEDURES:
1. Apply a first coat to completely cover base.
2. When surface moisture leaves, hand apply second coat in random directions.
Heavy Lace Stucco Finish
Spanish Stucco finish
SUGGESTED APPLICATION PROCEDURES:
1. Apply a first coat, leaving relatively smooth.
2. Apply second coat in a random texture, using overlapping strokes.
Monterey Stucco Finish
SUGGESTED APPLICATION PROCEDURES:
1. Apply a first coat, leaving relatively smooth.
2. Apply second coat in a random texture, using overlapping strokes.
SUGGESTED APPLICATION PROCEDURES:
1. Apply a heavy texture coat.
2. After surface moisture is absorbed, apply heavy second coat, leaving it rough under the trowel with small area texture pats.
Arizona Stucco Finish
SUGGESTED APPLICATION PROCEDURES:
1. Apply a first coat using double-back method, and rake with a coarse brush or broom.
2. Splatter dash sparingly with dash broom, using mortar of fairly stiff consistency to partially cover the surface.
3. After moisture leaves surface, trowel down high spots, retaining general pattern of dash texture.
Frieze Stucco Finish
English Stucco Finish
SUGGESTED APPLICATION PROCEDURES:
1. Apply a first coat to completely cover base.
2. Using a rounded trowel, apply a thick texture coat with short strokes in varying directions, leaving a rough, irregular pattern.
3. After moisture leaves surface, trowel down high spots, retaining general pattern.
Scraped Stucco Finish
SUGGESTED APPLICATION PROCEDURES:
1. Apply a finish coat approximately 1/4˝ thick and allow to take up until surface moisture leaves.
2. Scrape vertically with a steel joint rod or trowel held at right angles to the plane of the wall. Remove sufficient material to leave a torn surface, free from smooth spots and joinings.
SUGGESTED APPLICATION PROCEDURES:
1. Apply a first coat to completely cover base.
2. Apply a second coat with fan-shaped strokes, lapping each other so as to form narrow, high ridges where mortar flows over the toe of the trowel.
Trowel Sweep Stucco Finish
SUGGESTED APPLICATION PROCEDURES:
1. Apply a first coat and broom lightly in varying directions, using a sweeping motion.
2. Using a trowel, apply a texture coat in strips approximately 2˝ x 6˝ forming a more or less rectangular pattern.
3. Trowel surface lightly.
Web Stucco Finish
Briar Stucco Finish
SUGGESTED APPLICATION PROCEDURES:
1. Apply a first coat to completely cover base.
2. Apply a texture coat, holding trowel at angle to surface. With heel of the trowel serving as a pivot point, produce fan-like ridges in radiating pattern.
3. Flatten higher areas with trowel.
Combed Stucco Finish
SUGGESTED APPLICATION PROCEDURES:
1. Apply a finish coat in sufficient thickness to accommodate depth of grooves without exposing base (brown) coat.
2. Rod and darby, leaving surface reasonably straight and true.
3. Using a strip as a guide, comb surface vertically (or horizontally) with a template, formed to achieve pattern detailed on drawings.
Note: Special mix required.
SUGGESTED APPLICATION PROCEDURES:
1. Apply a first coat to completely cover base.
2. Apply a second coat of a specially prepared finish plaster containing selected sized pebbles to achieve desired texture.
3. The action of the trowel or float rolls the pebbles to create miniature troughs in a linear or circular pattern.
Rock ‘n’ Roll Stucco Finish
SUGGESTED APPLICATION PROCEDURES:
1. Apply a first coat to completely cover base.
2. Float the surface to raise the aggregate.
3. Apply a light texture coat over the floated surface.
Glacier Stucco Finish
Marblecrete Finish
SUGGESTED APPLICATION PROCEDURES:
1. Apply bedding coat to proper thickness.
2. Straighten with rod and darby, leaving surface reasonably smooth.
3. Apply aggregate to bedding coat.
4. After material takes a set, tamp in aggregate to embed into cement.
Note: This finish should only be performed by one qualified applicator for any one project.
Simulated Timber Finish
SUGGESTED APPLICATION PROCEDURES:
1. Spread finish coat plaster to desired panel texture.
2. Lay on a narrow band approximately 6˝ to 8˝ wide of same material in pattern of half-timber.
3. Cut shallow groove on each side of simulated timber.
4. Lightly trowel face of simulated timber to relatively smooth surface.
5. If peg marks are desired, lightly press large screw head near ends of simulated timber.
SUGGESTED APPLICATION PROCEDURES:
1. Apply finish coat 1/4˝ to 3/8˝ thick over the damp base.
2. Rod and darby.
3. Layout the design as shown on drawings. To simulate joints, stamp in lines with a joint rod or rake out with a raking tool.
4. Water trowel smooth, retaining indentations.
“Wet” Grooved Plaster Finish
SUGGESTED APPLICATION PROCEDURES:
1. Apply a first coat of mortar-colored joint material.
2. Apply a second coat of brick colored stucco material.
3. Comb or broom the surface with a coarse fiber brush or broom to achieve desired grain. A light troweled texture may also be applied.
4. Using a brick template or straight-edge, rake joints to depth required to expose mortar joint material.
Brick Finish
The above was referenced from Technical Service Information Bureau Plaster Textures & Acrylic Finishes